Wednesday, June 11, 2014


Sunday, March 23, 2014
A day long remembered...
Had a fantastic time at the club this week. We played Fantasy Flight's Star Wars: X-Wing Fighter, with generous assistance from member Stephen71, who kindly donated all the ships, tokens &c. needed for a group of 5 to field several ships each. The game's fairly simple to pick up and provides a lot of entertainment for the money. All that, plus pre-painted minis (always a bonus for those under time constraints) and, well, the unbridled joy manoeuvring TIE fighters or X-wings around the board, makes for one very enjoyable evening.
Firemonkeyboy has banged together a fine post concerning the game, its rules and his wing of TIE fighters; so I'll stick to describing some of the fun I had commanding the rest of the Empire's space craft.
I fielded 5 ships: two TIE fighters, nothing special; two TIE Interceptors, extra speedy and shooty; and one TIE Advanced x1, piloted by the Dark Lord of the Sith himself, Vader!
The way the board was set up, I would be squaring off against a pair of B-wings, which meant that the Rebel pilots would be out numbered 2 to 1. Then again, the B-wings are heavily shielded and carry a serious payload in comparison to TIE fighters.
I flew Vader off to add a little more fire power to Firemonkeyboy's squadron, he was facing off against two separate waves of Rebel Alliance fighters. One of these ships was piloted by some young upstart from Tatooine, name of Skywalker. So, y'know, pitting Luke against Vader was pretty much a foregone conclusion.
Despite the relative simplicity of the game's mechanics, it allows for decent tactical play while making sure that one false move on a player's part won't cost them the match. As my pilots (Vader excluded) would be facing superior firepower but less manoeuvrable ships, I decided to bait the B-wings with my TIEs while flanking them with my TIE Interceptors.
Formations flying is made quite easy by utilizing similar banks & turns with different distances covered by individual flyers. In no time my Interceptors were closing in on the B-wings from behind.
On the other side of the battlefield, Vader and Firemonkeyboy's TIEs made quick work of that hotshot Skywalker, who found himself outnumbered and outgunned. Poor Biggs went down a short while later.
By the time the B-wings realized that they'd need to change tactics, the TIEs were swarming all over them. With some crafty piloting, my Imperial fly boys were able to keep out of the B-wings' LoF and began taking potshots at the heavily shielded Rebel craft.
After several rounds of firing at the heavily shielded B-wings, the TIEs managed to down one and began to concentrate on the remaining Rebel pilot.
It seems the Force wasn't with the Alliance on this occasion because the B-wing pilot just couldn't keep the TIEs in his sight, and while he was busy trying to get a lock on them, Vader returned to his wing men and sealed the lone B-wing's fate.
Elsewhere on the board, Firemonkeyboy's TIE's had taken care of the remaining X-wing fighter and an ion cannon sporting Y-wing that joined the fight a little late. And as the Rebel battle plan collapsed, Vader rolled all hits on his damage dice, space-dusting the B-wing and bringing an end to both the game and any lingering doubt as to his continued status as the chosen one.
Needless to say, there's a bunch of us looking forward to the next session of Star Wars: X-Wing at the club. And rightly so, where else can you hum refrains from John Williams while sitting across from someone doing the very same thing.
Firemonkeyboy has banged together a fine post concerning the game, its rules and his wing of TIE fighters; so I'll stick to describing some of the fun I had commanding the rest of the Empire's space craft.
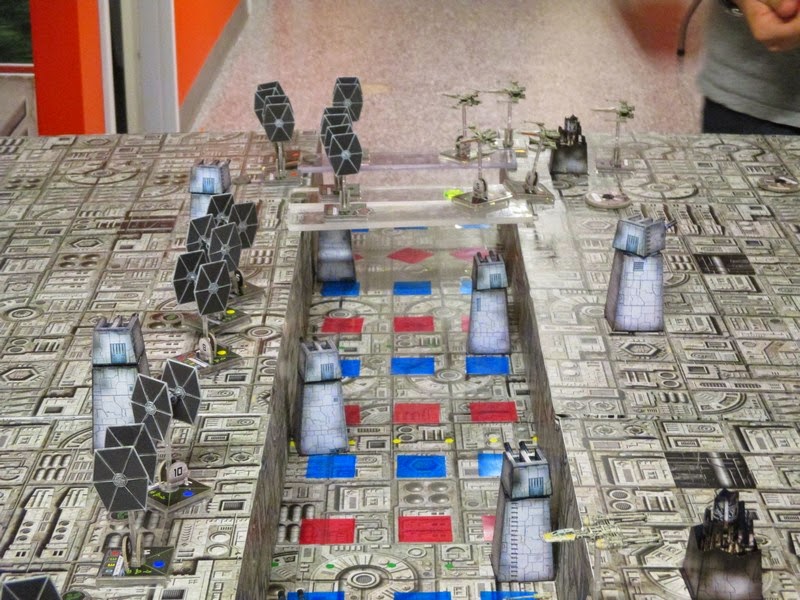
I fielded 5 ships: two TIE fighters, nothing special; two TIE Interceptors, extra speedy and shooty; and one TIE Advanced x1, piloted by the Dark Lord of the Sith himself, Vader!
 |
| On the prowl for rebel scum... |
The way the board was set up, I would be squaring off against a pair of B-wings, which meant that the Rebel pilots would be out numbered 2 to 1. Then again, the B-wings are heavily shielded and carry a serious payload in comparison to TIE fighters.
 |
| The B-wings course correct to intercept the Imperials and lock S-foils in attack position. |
I flew Vader off to add a little more fire power to Firemonkeyboy's squadron, he was facing off against two separate waves of Rebel Alliance fighters. One of these ships was piloted by some young upstart from Tatooine, name of Skywalker. So, y'know, pitting Luke against Vader was pretty much a foregone conclusion.
 |
| Lord Vader heads off for a family reunion. |
Despite the relative simplicity of the game's mechanics, it allows for decent tactical play while making sure that one false move on a player's part won't cost them the match. As my pilots (Vader excluded) would be facing superior firepower but less manoeuvrable ships, I decided to bait the B-wings with my TIEs while flanking them with my TIE Interceptors.
 |
| The Interceptors whiz past the B-wings as the Rebels target lock the TIE fighters. |
Formations flying is made quite easy by utilizing similar banks & turns with different distances covered by individual flyers. In no time my Interceptors were closing in on the B-wings from behind.
 |
| Back door...good idea! |
On the other side of the battlefield, Vader and Firemonkeyboy's TIEs made quick work of that hotshot Skywalker, who found himself outnumbered and outgunned. Poor Biggs went down a short while later.
 |
| Run, Luke, Run!!! |
By the time the B-wings realized that they'd need to change tactics, the TIEs were swarming all over them. With some crafty piloting, my Imperial fly boys were able to keep out of the B-wings' LoF and began taking potshots at the heavily shielded Rebel craft.
 |
| TIEs weave in and around the banking B-wings. |
After several rounds of firing at the heavily shielded B-wings, the TIEs managed to down one and began to concentrate on the remaining Rebel pilot.
 |
| And then there was one. |
It seems the Force wasn't with the Alliance on this occasion because the B-wing pilot just couldn't keep the TIEs in his sight, and while he was busy trying to get a lock on them, Vader returned to his wing men and sealed the lone B-wing's fate.
 |
| There would be no escape for the prince...er... B-wing this time! |
Elsewhere on the board, Firemonkeyboy's TIE's had taken care of the remaining X-wing fighter and an ion cannon sporting Y-wing that joined the fight a little late. And as the Rebel battle plan collapsed, Vader rolled all hits on his damage dice, space-dusting the B-wing and bringing an end to both the game and any lingering doubt as to his continued status as the chosen one.
 |
| The Die is strong with this one! |
Needless to say, there's a bunch of us looking forward to the next session of Star Wars: X-Wing at the club. And rightly so, where else can you hum refrains from John Williams while sitting across from someone doing the very same thing.
Saturday, March 8, 2014
Not too far a Bridge
It's been a while since my last post, but things get hectic and 'one thing drives out another' as a wise barkeep once mentioned. That said, I finally got back to the THMG this week and broke out my Germans for a little bit of Bolt Action...action. A new member, Stephen71, was happy enough to provide some Russians for the table and we settled on an early war engagement. Some people would say this just means cruddy tanks compared to later theatres, but let me tell you, when you can't field Panzerfäuste or Panzerschreck-teams, a light tank is a more than scary prospect!
Set up & Turn One
The scenario was 'Hold until Relieved' and the Germans were defending the objective, in this case the sole bridge, the only one for kilometres around, over a nameless Russian. The Germans were using it to keep supply lines flowing, Ivan was aiming to put a stop to that.
In this scenario, the defender sets up one infantry unit and one other unit (though nothing heavier than a 7+ save). Then the attacker gets to place any to all of his infantry on the board, no closer than 18" to the objective. The idea being that the defender will need time to call in reinforcements, but will get the advantage of seeing where they'll be needed most.
Accordingly the Germans set up a squad of infantry in the riverside storehouse and a medium howitzer (a favourite of mine) in a close by apple orchard, covering the approach to the bridge.
Russian command decided to start all troops on the far side of the river, which meant that they wouldn't be able to flank the German units quickly but also wouldn't be counter-flanked by the soon-to-arrive German reinforcements.
After an initial miss by the German howitzer, the Russians had a run of dice and decided to concentrate on knocking out that artillery. They dropped a perfectly aimed mortar on it while their MG team and advancing infantry peppered it with bullets. The Ivans also brought on their BA-10 in an attempt to take out the German big gun (thankfully, their T-34 failed it's morale check, so I didn't have to deal with the Russians' heavy armour this turn). All that only managed to down one German Artillery man (all praise to the gun shield!), but it did cause several pins, effectively crippling the howitzer in the coming turns.
According to the rules of the scenario, the defenders are allowed to bring on reinforcements during the first turn w/o rolling for morale. Since the Russians were all on the far side of the river, the Germans didn't need to spend too much time worrying about where best to deploy their oncoming troops. Instead, MG and infantry squad hustled forward into cover where possible; the German armour (a Panzer 38t and an Sdkfz 231 armoured car) drove onto the board, one on each flank.
Turn Two
Turn two saw the action really start to heat up, which is different from my usual experience in Bolt Action, where the cat & mouse manoeuvring usually lasts into turns 3 to 4. The Germans stationed near the bridge moved into a better firing position and tore into the advancing Russian infantry while MG squads laid down fire elsewhere. The Panzer 38t hit the Russian BA-10, sparking a fire that nixed the armoured car's ability to act this turn. The German howitzer tried, but failed to rally as the crew spend the round recovering.
On the Russian side, the mortar team decided to retreat behind cover rather than drop another round on the howitzer, which was certainly a relief for me. Then again, the T-34 made its appearance, firing on the Sdkfz 231, which wisely reversed into cover rather than face the it.
The Russian second line began to move through the wheat fields at the Russian rear, perhaps not the greatest tactical move as this would make it hard for them to reinforce their comrades under fire in a timely manner. Then again, discretion is the better part of valour. The foremost Russian infantry squad followed suit and withdrew to the safety of stone wall they'd left a turn earlier.
Turn Three
A solid round for the defenders. The Panzer 38t immobilized the Russian BA-10 and added to its pins, and in a stroke of incredible Glück, the Sdkfz's Lt. Auto-cannon managed to penetrate the T-34's side armour, igniting a fire that would cost the tank its turn! The MG 42s did what they do best, adding pins to Ivan's infantry and taking out the Russian MG to boot. Meanwhile the howitzer rallied with a roll of six, removing all pins -the big boom was back in the game!
The Russians put the hurt on the German infantry at the river, almost forcing them to make a moral check, but the BA-10 couldn't follow up as its pins (now a whopping 5) meant that it failed to activate. Nor was any help coming from the Russian second line, which continued to slog its way through the wheat fields.
Turn Four
With a roar the German howitzer announced its reentry into the battle, it slammed a round into the front of the T-34 and knocked it out, effectively neutralizing any threat from the Russian left. The Panzer 38t rolled over the bridge and destroyed the BA-10, ending the chance of further contribution from Russian armour. This left the road open for German infantry, which began to move forward and lay down fire on the only Russian target available, the infantry squad behind the stone wall, which was picking up pins at an alarming rate. The Russian commissar did join their ranks in an attempt to rally them, but to no avail. The remaining Russians were still busy munching wheat.
Turn Five
With their numbers dwindling and moral cracking, there wasn't much action from the Russians this turn. The errant infantry squad did finally emerge from their wheaty wanderings, but could do little else to help the remnants of the other infantry squad, who failed to rally despite the commissar's best efforts to the contrary.
Under orders from their C.O., the German force moved forward and the 38t rolled up on the Russian infantry and let loose with its MGs. The howitzer re-positioned and readied for next turn. German infantry advanced into the cover of the BA-10's wreckage, making way for the Sdkfz 321, which was speeding towards the Russians.
Turn Six & Endgame
The German armour continued to roll forward, engaging the Russian infantry whose gamble on a circuitous route hadn't paid off. With units either heavily pinned or routing, the Russian commander sounded the retreat and Ivan fled, leaving the bridge firmly in the hands of the German invaders.
So, another comfortable victory for the Germans and, more importantly, a very enjoyable game of Bolt Action. It had been some time since I'd broken out my Jungs, but I'm hoping the next game is much sooner. And, of course, many thanks for Stephen71, whom I hope to see again soon at the club.
Set up & Turn One
The scenario was 'Hold until Relieved' and the Germans were defending the objective, in this case the sole bridge, the only one for kilometres around, over a nameless Russian. The Germans were using it to keep supply lines flowing, Ivan was aiming to put a stop to that.
 |
| A River Runs Through it. |
In this scenario, the defender sets up one infantry unit and one other unit (though nothing heavier than a 7+ save). Then the attacker gets to place any to all of his infantry on the board, no closer than 18" to the objective. The idea being that the defender will need time to call in reinforcements, but will get the advantage of seeing where they'll be needed most.
Accordingly the Germans set up a squad of infantry in the riverside storehouse and a medium howitzer (a favourite of mine) in a close by apple orchard, covering the approach to the bridge.
 |
| Waiting for Ivan. |
Russian command decided to start all troops on the far side of the river, which meant that they wouldn't be able to flank the German units quickly but also wouldn't be counter-flanked by the soon-to-arrive German reinforcements.
 |
| The Red Tide. |
After an initial miss by the German howitzer, the Russians had a run of dice and decided to concentrate on knocking out that artillery. They dropped a perfectly aimed mortar on it while their MG team and advancing infantry peppered it with bullets. The Ivans also brought on their BA-10 in an attempt to take out the German big gun (thankfully, their T-34 failed it's morale check, so I didn't have to deal with the Russians' heavy armour this turn). All that only managed to down one German Artillery man (all praise to the gun shield!), but it did cause several pins, effectively crippling the howitzer in the coming turns.
 |
| Here they come! |
 |
| The Ruskies form a second line further back. |
According to the rules of the scenario, the defenders are allowed to bring on reinforcements during the first turn w/o rolling for morale. Since the Russians were all on the far side of the river, the Germans didn't need to spend too much time worrying about where best to deploy their oncoming troops. Instead, MG and infantry squad hustled forward into cover where possible; the German armour (a Panzer 38t and an Sdkfz 231 armoured car) drove onto the board, one on each flank.
 |
| An Sdkfz rolls up the German right, firing on that crack-shot Russian mortar team before lands another round of the beleaguered howitzer |
Turn Two
Turn two saw the action really start to heat up, which is different from my usual experience in Bolt Action, where the cat & mouse manoeuvring usually lasts into turns 3 to 4. The Germans stationed near the bridge moved into a better firing position and tore into the advancing Russian infantry while MG squads laid down fire elsewhere. The Panzer 38t hit the Russian BA-10, sparking a fire that nixed the armoured car's ability to act this turn. The German howitzer tried, but failed to rally as the crew spend the round recovering.
 |
| Die Jungs give Ivan cause for pause on the Russian's right flank. |
On the Russian side, the mortar team decided to retreat behind cover rather than drop another round on the howitzer, which was certainly a relief for me. Then again, the T-34 made its appearance, firing on the Sdkfz 231, which wisely reversed into cover rather than face the it.
The Russian second line began to move through the wheat fields at the Russian rear, perhaps not the greatest tactical move as this would make it hard for them to reinforce their comrades under fire in a timely manner. Then again, discretion is the better part of valour. The foremost Russian infantry squad followed suit and withdrew to the safety of stone wall they'd left a turn earlier.
 |
| The Russians counter by threatening the German right flank. |
Turn Three
A solid round for the defenders. The Panzer 38t immobilized the Russian BA-10 and added to its pins, and in a stroke of incredible Glück, the Sdkfz's Lt. Auto-cannon managed to penetrate the T-34's side armour, igniting a fire that would cost the tank its turn! The MG 42s did what they do best, adding pins to Ivan's infantry and taking out the Russian MG to boot. Meanwhile the howitzer rallied with a roll of six, removing all pins -the big boom was back in the game!
 |
| Panzer 38t >... |
 |
| ...Ba-10 |
 |
| Maybe they're just hungry? |
With a roar the German howitzer announced its reentry into the battle, it slammed a round into the front of the T-34 and knocked it out, effectively neutralizing any threat from the Russian left. The Panzer 38t rolled over the bridge and destroyed the BA-10, ending the chance of further contribution from Russian armour. This left the road open for German infantry, which began to move forward and lay down fire on the only Russian target available, the infantry squad behind the stone wall, which was picking up pins at an alarming rate. The Russian commissar did join their ranks in an attempt to rally them, but to no avail. The remaining Russians were still busy munching wheat.
 |
| The German advance across the bridge. |
Turn Five
With their numbers dwindling and moral cracking, there wasn't much action from the Russians this turn. The errant infantry squad did finally emerge from their wheaty wanderings, but could do little else to help the remnants of the other infantry squad, who failed to rally despite the commissar's best efforts to the contrary.
 |
| Better late than never! |
Under orders from their C.O., the German force moved forward and the 38t rolled up on the Russian infantry and let loose with its MGs. The howitzer re-positioned and readied for next turn. German infantry advanced into the cover of the BA-10's wreckage, making way for the Sdkfz 321, which was speeding towards the Russians.
| Point Blank Tank!! |
Turn Six & Endgame
The German armour continued to roll forward, engaging the Russian infantry whose gamble on a circuitous route hadn't paid off. With units either heavily pinned or routing, the Russian commander sounded the retreat and Ivan fled, leaving the bridge firmly in the hands of the German invaders.
 |
| The Russians learn that late isn't always better than never. |
 |
| A gut day for the Huns. |
So, another comfortable victory for the Germans and, more importantly, a very enjoyable game of Bolt Action. It had been some time since I'd broken out my Jungs, but I'm hoping the next game is much sooner. And, of course, many thanks for Stephen71, whom I hope to see again soon at the club.
Thursday, November 28, 2013
Operation Quarterback
Had an amazing time last weekend down at Dueling Grounds, where a group of
8 of us partook in Operation Quarterback, a one-off campaing designed by one
of the THMG members, Watts. The campaign saw participants play out three
scenarios designed to simulate the Allies' advance following D-Day. The Allies'
objective was to clear a path to the French town of Chavingy for the advancing
U.S. armour and then take the town from the German forces occupying it.
The event was a smashing success: everyone involved had a blast and there were
many got'cha moments on both sides. In the end the Germans retained possession
of the town, denying the Americans access for their armour and then pushing them
back in a final scenario that saw both teams united on one table as the Wehrmacht
counter-attacked the beleaguered U.S. troops . For the players, however, everyone
emerged a victor.
I have to admit, I was all too caught up in the day to take pictures of more than my
first game; but you can check out firemonkeyboy's blog, a fellow THMGer, for a
look at things from a U.S. perspective, and Þorsteinn offers a second German
Anschauung from his blog.
Set Up & Turn 1
Round one of the campaign individual German and American players squaring off in
a 'point defence' scenario', where the attackers (the Americans, as the Germans were
defending their captured town) would need to take and hold objectives. I chose to
deploy my force on a table representing one of the swampy areas lying around Chavigny.
This was a calculated decision: some players on the German team had designed forces
better equipped for the close quarters of the town, others -your's truly included-
for open ground.
The board was set up with fairly open ground on the right, sparse tree cover and a few
swamps; the left side had more forests and a couple of hills, offering a safer option
for advancing troops. To counter the latter area's abundance of cover, I set up barbed
wire (which forces soldiers to slow while crossing and take a pin) there. On the right, I
positioned my Howitzer and an MMG to take advantage of the lines of fire. The rest of
my men were interspersed in the copses of trees, waiting to see and react to where the
Americans entered the board.
Things got off to a good start for me when the American's preparatory bombardment,
a scenario rule designed to soften up the defenders since their troops start hidden, failed
to materialize (i.e. my opponent rolled a 1 on a d6). So, the Americans, under the esti-
mable leadership of my opponent, Toby, had to take to the table without so much as a
single pin on the German forces -ouch! They advanced cautiously trying to suss out any
weak points in the German's lines.
Turns 2 & 3
Not seeing any easy way to move forward, the American decided to hug to the
more heavily covered side of the board, moving up behind the cover of trees to
keep out of sight of the German artillery and MMG, but knowing that at some
point they'd have to face a barrage from the howitzer. The Germans countered
by moving troops up towards the barbed wire, making sure the Americans were
only able to advance so far before coming under fire.
Toby did try was to sneak a unit of men down the extreme left of the board, in a
gamble to seize one of the objectives before my troops could react. Luckily for me,
on turn three my Grille, a self-propelled artillery piece, passed its morale check and
rumbled onto the board. A round from the Grille's heavy mortar spelt an end to those
G.I.'s as well as U.S. hopes of a two-pronged assault.
Turns 4 & 5
The Americans fared no better in the following rounds, howitzer and
machine gun fire whittled away at another unit of G.I.'s and with only one
more infantry unit and special teams remaining, the American's hopes of
taking either of the objectives was quickly diminishing. To keep things inter-
esting, I sent a unit of Germans forward towards a copse of trees at the cen-
tre of the board, to see whether they could dislodge the bazooka team there
and force the Americans farther back into their deployment zone (sc. keep the
game fun for both sides).
Turns Six & Endgame
Most of the action took place now between the remaining American troops at
the centre of the table and the lone group of German infantry that had advanced
to meet them. My Panzergrenadiers pounced on the hapless 'Bazooks', the sole unit
remaining in the two-man Bazooka team and easily overpowered him in a quick
and bloody mêlée before regrouping by pushing further into the woods to protect
themselves from the small arms fire of the remaining American troops.
In retrospect, this was a risky move and my troopers quickly found themselves
under heavy fire from both the Americans command squad and the last unit
of U.S. G.I.'s. They eventually fell in hand-to-hand to the Americans and their
SMG's, but by this time a German victory was a foregone conclusion in this match.
Again, my thanks to all who participated in the one-day campaign, and especially to
Watts for his organisation of the entire event. I sounds like the next one will be in North
Africa pitting Rommel's forces against the Americans and British.
8 of us partook in Operation Quarterback, a one-off campaing designed by one
of the THMG members, Watts. The campaign saw participants play out three
scenarios designed to simulate the Allies' advance following D-Day. The Allies'
objective was to clear a path to the French town of Chavingy for the advancing
U.S. armour and then take the town from the German forces occupying it.
 |
| Chivigny and environ from the players' briefing |
The event was a smashing success: everyone involved had a blast and there were
many got'cha moments on both sides. In the end the Germans retained possession
of the town, denying the Americans access for their armour and then pushing them
back in a final scenario that saw both teams united on one table as the Wehrmacht
counter-attacked the beleaguered U.S. troops . For the players, however, everyone
emerged a victor.
I have to admit, I was all too caught up in the day to take pictures of more than my
first game; but you can check out firemonkeyboy's blog, a fellow THMGer, for a
look at things from a U.S. perspective, and Þorsteinn offers a second German
Anschauung from his blog.
Set Up & Turn 1
Round one of the campaign individual German and American players squaring off in
a 'point defence' scenario', where the attackers (the Americans, as the Germans were
defending their captured town) would need to take and hold objectives. I chose to
deploy my force on a table representing one of the swampy areas lying around Chavigny.
This was a calculated decision: some players on the German team had designed forces
better equipped for the close quarters of the town, others -your's truly included-
for open ground.
The board was set up with fairly open ground on the right, sparse tree cover and a few
swamps; the left side had more forests and a couple of hills, offering a safer option
for advancing troops. To counter the latter area's abundance of cover, I set up barbed
wire (which forces soldiers to slow while crossing and take a pin) there. On the right, I
positioned my Howitzer and an MMG to take advantage of the lines of fire. The rest of
my men were interspersed in the copses of trees, waiting to see and react to where the
Americans entered the board.
Things got off to a good start for me when the American's preparatory bombardment,
a scenario rule designed to soften up the defenders since their troops start hidden, failed
to materialize (i.e. my opponent rolled a 1 on a d6). So, the Americans, under the esti-
mable leadership of my opponent, Toby, had to take to the table without so much as a
single pin on the German forces -ouch! They advanced cautiously trying to suss out any
weak points in the German's lines.
 |
| German Artillery awaits the coming U.S. Troops |
Turns 2 & 3
Not seeing any easy way to move forward, the American decided to hug to the
more heavily covered side of the board, moving up behind the cover of trees to
keep out of sight of the German artillery and MMG, but knowing that at some
point they'd have to face a barrage from the howitzer. The Germans countered
by moving troops up towards the barbed wire, making sure the Americans were
only able to advance so far before coming under fire.
 |
| Die Jungs wait in the cover trees for targets to appear. |
Toby did try was to sneak a unit of men down the extreme left of the board, in a
gamble to seize one of the objectives before my troops could react. Luckily for me,
on turn three my Grille, a self-propelled artillery piece, passed its morale check and
rumbled onto the board. A round from the Grille's heavy mortar spelt an end to those
G.I.'s as well as U.S. hopes of a two-pronged assault.
 |
| Here comes the Boom! |
Turns 4 & 5
The Americans fared no better in the following rounds, howitzer and
machine gun fire whittled away at another unit of G.I.'s and with only one
more infantry unit and special teams remaining, the American's hopes of
taking either of the objectives was quickly diminishing. To keep things inter-
esting, I sent a unit of Germans forward towards a copse of trees at the cen-
tre of the board, to see whether they could dislodge the bazooka team there
and force the Americans farther back into their deployment zone (sc. keep the
game fun for both sides).
 |
| The Panzergrenadiers charge out of cover while the MG 42 covers their advance. |
Turns Six & Endgame
Most of the action took place now between the remaining American troops at
the centre of the table and the lone group of German infantry that had advanced
to meet them. My Panzergrenadiers pounced on the hapless 'Bazooks', the sole unit
remaining in the two-man Bazooka team and easily overpowered him in a quick
and bloody mêlée before regrouping by pushing further into the woods to protect
themselves from the small arms fire of the remaining American troops.
 |
| Dran, drauf, drüber! The Panzergrenadier overrun the American-held position in the woods. |
In retrospect, this was a risky move and my troopers quickly found themselves
under heavy fire from both the Americans command squad and the last unit
of U.S. G.I.'s. They eventually fell in hand-to-hand to the Americans and their
SMG's, but by this time a German victory was a foregone conclusion in this match.
Again, my thanks to all who participated in the one-day campaign, and especially to
Watts for his organisation of the entire event. I sounds like the next one will be in North
Africa pitting Rommel's forces against the Americans and British.
Thursday, November 7, 2013
No Yankee Blues!
Tried a new game last week, Longstreet. Set in the American
Civil War, it's a table top game that introduces card play, where
the cards are employed either as currency (activate troops, diminish
casualties, &c.) or as special events (with the event being detailed
on the card played). It makes for an interesting game as players must
keep an eye on what their troops are doing on the table as well as
deliberating meta-gaming decisions about what cards they want
to play or keep.
Set Up
In the scenario the Confederate troops were tasked with taking
two objectives (represented by the gray tents you'll see in the
photos). To succeed, they only had to capture (sc. touch with a
unit) one; but they'd have to ford a river and tromp through some
woods to get there. Oh, and did I mention my Blue Coats?
Yeah, the Union wasn't about to let those dirty Grey Backs
just saunter in.
Turns 1 & 2
Not much to tell, here: mostly movement with the Union troops taking
potshots at the advancing Grey Backs. The cannon on the Union
left fired repeatedly on a column of Confederate cavalry but were
largely ineffective, despite all the bonuses offered by the dice re-rolls
granted to my side with its seasoned artillery.
Turn 3
By turn three the Johnny Rebs had finally schlepped it over the
river and through the forests. In the face of this, the Union troops
had reversed marched. No doubt the Confederate recruits gave
a cheers they saw what they believed to be Union troops back-
pedalling; the grizzled vets knew better, the Yankees were just
maximizing firing opportunity
Now the action started in earnest. My Union soldiers volley'd and
thunder'd with shot and shell from one end of their line to the other.
Damage wasn't spectacular but shut those pie-eating Southerners
up. Fewer cheers rose from the Confederate troops as the Blue
Coats reverse marched again to prepare for their next volley.
Turn 4
The Confederates finally made it out of the woods and into a position
Turn 5
The Rebel artillery finally came into play this turn and blew away two units
of my cavalry; doing as much damage to my forces as the entire Union battery
had managed thus far!
Perhaps shamed by success of the Confederate artillery, my cannon finally
scored a solid hit, obliterating the Confederate cavalry struggling in the river.
Turn 6
Endgame
At this point, the Confederate general decided prudence was the better
part of valour and chose to save his men's lives rather than risk another
assault on the objectives. Also, it was late and beer waits for no man.
My thanks to Thor, who elected to play the dirty Confederates and for
having the best name ever; and to Marke, for officiating the entire match
and helping me pick up the rules as we went along.
Civil War, it's a table top game that introduces card play, where
the cards are employed either as currency (activate troops, diminish
casualties, &c.) or as special events (with the event being detailed
on the card played). It makes for an interesting game as players must
keep an eye on what their troops are doing on the table as well as
deliberating meta-gaming decisions about what cards they want
to play or keep.
Set Up
In the scenario the Confederate troops were tasked with taking
two objectives (represented by the gray tents you'll see in the
photos). To succeed, they only had to capture (sc. touch with a
unit) one; but they'd have to ford a river and tromp through some
woods to get there. Oh, and did I mention my Blue Coats?
Yeah, the Union wasn't about to let those dirty Grey Backs
just saunter in.
 |
| The initial setup: Rebels on the left, Heroe..er, Union on the right. |
 |
| On the Confederate side, the infantry units line up behind a low wall and in the trees under the watchful eye of their commander |
 |
| At the other end of the Rebel's line, a lone unit of veteran cavalry eyes up the Union troops across the river. |
Turns 1 & 2
Not much to tell, here: mostly movement with the Union troops taking
potshots at the advancing Grey Backs. The cannon on the Union
left fired repeatedly on a column of Confederate cavalry but were
largely ineffective, despite all the bonuses offered by the dice re-rolls
granted to my side with its seasoned artillery.
 |
| The stalwart Union infantry fire on their erstwhile countrymen, trusting in God and, more importantly... |
 |
| ...in the cannons to the the left of them... |
 |
| ...and the cannon to their right! |
Turn 3
By turn three the Johnny Rebs had finally schlepped it over the
river and through the forests. In the face of this, the Union troops
had reversed marched. No doubt the Confederate recruits gave
a cheers they saw what they believed to be Union troops back-
pedalling; the grizzled vets knew better, the Yankees were just
maximizing firing opportunity
Now the action started in earnest. My Union soldiers volley'd and
thunder'd with shot and shell from one end of their line to the other.
Damage wasn't spectacular but shut those pie-eating Southerners
up. Fewer cheers rose from the Confederate troops as the Blue
Coats reverse marched again to prepare for their next volley.
 |
| The fire power of this fully-armed and operation Union army! |
Turn 4
The Confederates finally made it out of the woods and into a position
to fire on my stalwart ranks. The Confederate cavalry on the Union's
left flank (hence-forth aptly named the‘Dukes of Hazard’), who had
by this time emerged from four salvos of cannon fire seemingly unscathed,
surged out of the river and threatened to break through the Union left. On
the Union's right flank, the other Rebel cavalry, still experiencing problems
crossing the river, decided to hunker down and fire at the Union ranks
arrayed to their fore.
 |
| 'Looks like them Duke Boys are at it again!': the Confederate cavalry closes the distance on the Union left |
 |
| On the Union's right flank, the other Confederate cavalry, the 'Artexes & Atreyus', just can't seem to escape the river -how sad. |
Turn 5
The Rebel artillery finally came into play this turn and blew away two units
of my cavalry; doing as much damage to my forces as the entire Union battery
had managed thus far!
Perhaps shamed by success of the Confederate artillery, my cannon finally
scored a solid hit, obliterating the Confederate cavalry struggling in the river.
This effectively ended the threat to one of the two objectives and the
Union
troops start to swing around to flank attack the Confederate dogs.
troops start to swing around to flank attack the Confederate dogs.
 |
| Johnny Reb's cannon finally comes into play as the Confederate left begins to buckle |
Turn 6
Fire from units on both sides and the 'Dukes of Hazard' move
dangerously close before they receive a full barrage from the
Union artillery
followed up by a charge from the Union grunts
guarding only objective still in
play. The ‘Dukes’ are thrown
back, though still manage to survive the withering
fire and
bayonets –tough nuts!
Elsewhere on the field, the Union cavalry smashed into the flank
of Rebel soldiers and caused them to flee and Union troops fare
similarly well at the centre of the table, driving one unit of those
pie-eating rebel scum right back through the woods they’d fought
so long to pass through.
 |
| 'Looks like the Duke Boys are in a heap o' trouble!' |
 |
| Union Flag held high, the Yankee cavalry smashes into the beleaguered Confederate's flank |
 |
| And...back they go! |
Endgame
At this point, the Confederate general decided prudence was the better
part of valour and chose to save his men's lives rather than risk another
assault on the objectives. Also, it was late and beer waits for no man.
My thanks to Thor, who elected to play the dirty Confederates and for
having the best name ever; and to Marke, for officiating the entire match
and helping me pick up the rules as we went along.
Subscribe to:
Posts (Atom)